Making a dll file is very useful if you need your code to be easily used in multiple places. Ex. Let's say you have a genius idea on how to add two numbers, but you don't want to make the code public in fear of someone stealing your idea and taking credit. Using a dll file is the most common and efficient way to achieve that.
A DLL is a library that contains code and data that can be used by more than one program at the same time. For example, in Windows operating systems, the Comdlg32 DLL performs common dialog box related functions. Therefore, each program can use the functionality that is contained in this DLL to implement an Open dialog box. This helps promote code reuse and efficient memory usage.
-Microsoft
Visual studio makes it very easy to make/use a dll file. It is very similar to making a regular console application, but your dll will only contain methods. Let's get started.
In Visual Studio create a new Class Library project named namespace Addition of Nums. You will see this project is very similar to a console project. The main difference is that there is no Main method, which is the entry of a console application.
Rename the Class1.cs file to Add.cs and add this code in that file.
|
|
Next we want to build this project in Release mode not Debug. This won't really play a major role in our case, since there is only one really basic method, without any configuration changes, but it is a good habit to remember to always switch to Release mode before using the dll in other applications.
Now we want to go to the location of where the dll has been created. In C:\Users\{ComputerName}\Documents\visual studio 2013\Projects\Practice\Addition of Nums\bin\Release you should see a dll file named Addition of Nums.dll. This is what we created.
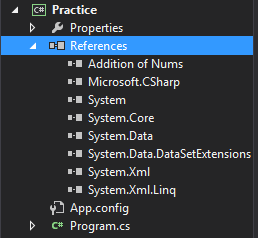
Now to use it let's create a new Conosle application. Before we can start using it we need to reference the dll which we just created. Right click References in your project and select Add Reference. Next you will want to browse to the location to where your dll is and select it. After doing that you should see the dll name appear under the References dropdown.
The code to use our add method the same way you would use for any other class.
|
|
One thing to notice is that you have to include the using Addition_of_Nums so that Visual Studio will know we are actually using that library. You can see that all the names that we use here are from the dll file. Addition_of_Nums is the name of the namespace, Add is the name of the class, and add is the name of the method.
If you want to read more details about what a dll file is, you can read this Microsoft page.